Wednesday, May 09, 2012

Function over Tradition: Kids Art Supply Storage

Baby X Prime (X') is kicking me out of my craft room and I'm moving it downstairs into what is now affectionately known as the Dog Room.  Which means everything currently being stored in the craft room either needs to find a new home (hello crafts I never started!) or a different storage space in our house.

BabyT has acquired quite the collection of art supplies because we love doing "Art Projects", as she calls them.  They didn't really have a home.  Some of them live on our kitchen counter for easy access (watercolor paint, crayons and coloring books), and the rest are scattered in drawers in my craft room wherever I had space. 

Not  a good solution for me to see *what* we have.  So I only ever used the crayons and watercolors because going through "the pile" was too hard.

Clearly this wasn't working, and now that T is in such a structured preschool, I want to spend lots of time doing art with her.  She definitely gets some at school, but not every day, and she loves it.  (I miss that about daycare!)

When we remodeled our kitchen in 2004, we took out all the old oak cabinets, but saved one of the glass-door ones to be mounted in the dining area for our glassware.  We got tons of wine and champagne glasses as wedding presents, and also inherited a bunch of glasses from TJ's grandmother.  The cabinet was quite full.

It occurred to me the other night that we don't need to have such easy access to *that many* wineglasses.  We don't drink that much wine and only have lots of people over on rare occasions, maybe a few times a year.  If that.

So we decided to move our glassware to a different high shelf in the kitchen, box up the extra ones and our fancy china which we use only once or twice a year.  TJ picked up some dishware boxes from UHaul and packed it all away one day when I was at work (*swoon*).

Which left this handy, spacious cabinet available for toddler art supply storage.  Hooray!


kitchen cabinet for kid art supplies


I know it's traditionally not what we're supposed to put in a glass-front cabinet in our dining area.  But it's *so* much more functional for us.  And I have a better idea of what we have, and what we need.  And what we most definitely don't need (no more paper or coloring books!).

It makes it so much easier to set up a project for T quickly on the dining table since it's right there.  When she's a little older, she'll be able to reach the cabinet and get things out for herself.

I'm considering putting some decorative paper inside the glass doors to hide the stuff inside from view, since it's not particularly pretty, but that may never happen.

This simple change makes me ridiculously happy (sort of like paring our kitchen knife collection down to just 7 that we use all the time).  Strange, I know.

Got any good storage hacks to share?  :)

Monday, May 07, 2012

Seven years is all she wrote

Seven years ago, TJ & I got married.


It was perfect.


To celebrate today, we took our favorite person to the zoo.

toddler dancing

I'm a lucky woman.  Life is good.

Saturday, May 05, 2012

Strange Coincidences

In the past week, two things happened which were unexpected and very cool.

I got another one of those "free drink" coupons at Starbucks that comes from using my Starbucks card way too much.  I've been hoarding it for the right time as I'm trying to save some money.  I love my chai, but I don't *need* one every day to make me happy.  Maybe just a couple of times a week.  I was wishfully thinking about how I could get more free Starbucks drinks.

And then, the next day, we got a letter in the mail from our mortgage broker.  With a $25 gift card from Starbucks, because TJ referred someone to them.  How freaky cool is that??

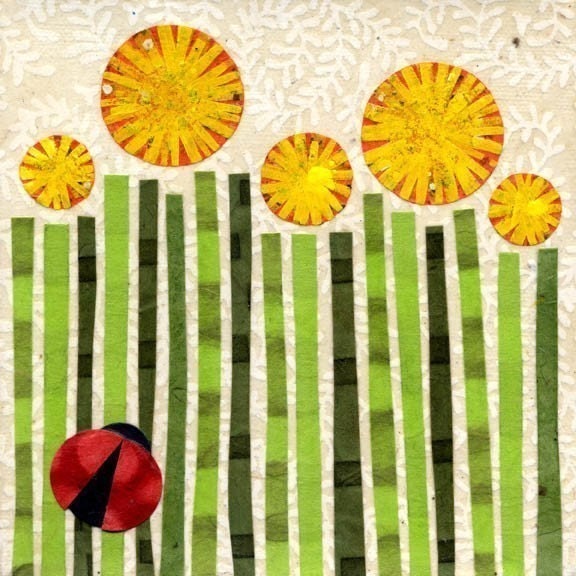
Second weird coincidence:  last week I had to get blood drawn.  In my doctor's office there were these really awesome paper collages - cute sunny scenes that made me happy.  Here's the one I liked best:

Dandies in a Field by Kate Endle

I couldn't find the artist's name, and had to hurry out of there to get back to work.  Through the week I thought about those collages and wondered who the artist was.  I have another appointment in a few weeks so I vowed to ask then.

Last night I was reading a coworker's lovely blog, and saw she had a link to the new Caspar Babypants album Hot Dog! and a quick mention that his wife was also very talented, with a link to an Etsy shop.  So I clicked over and what did I see?  My beloved collage from the doctor's office!  Hooray.  I was *so* surprised.

I am thrilled to know the artist's name, and that her work is affordable.  Once we figure out Baby X's sex and theme for his/her room, I'm totally coming back to her shop.  And I may even get a little something for my new craft room. 

Both of these things reminded me of something we talked about in my Mondo Beyondo class last year - little random good things that happen that move us forward towards one of our dreams.  These two things are so trivial, but what amazes me is just the thought in my head of "I wish..." resulted in me getting just a tiny bit more happiness in my life.

Obviously, I should be wishing for things like winning the lottery, right?  Heh.

If you are contemplating taking Mondo Beyondo, they are running a HUGE sale right now to get the $99 class for only $49.  It's so totally worth it.  Use coupon code mamasrock49 at checkout, but this is only good through the end of day Sunday (tomorrow).

Let me know if you decide to sign up?  I'm in for the Dream Lab class in June (you can also use the coupon for that too!).

Friday, May 04, 2012

How to Make a Felt Board for the Crafty Challenged - Experiment 10

Today I spent about $30 and many hours making a felt board for T.  I guess technically it's a flannel board, since the board itself is covered in flannel.  For those who haven't seen these before, it's something found in a lot of preschools - a board full of shapes that can be moved around to make pictures and stories.  The awesome thing is that you don't need magnets or velcro - the felt just sticks to itself!


I first saw these in action at the Seattle Aquarium in February.  They had a HUGE board with lots of fish and aquatic plant shapes. We had to drag T away from it to go see the rest of the exhibits.  Then we saw one last week at our friend E's house, which inspired me to make one.

I did several online searches to find a decent tutorial that explained what kind of felt to use.  I came up empty.  No, I didn't look on Pinterest.  The tutorials I did find went mostly like this:

1.  Stick (or staple) felt to board.
2.  Cut out shapes.

I don't do a lot of fabric crafting, so I needed more details.  What kind of felt?  Are the shapes made out of the same stuff as the board? 

So I turned to my trusty (and crafty!) Facebook friends, and asked them.  K told me to use flannel for the board itself, then felt for the pieces.  She used a thrift store frame for the board, which is what Martha Stewart recommends. 

Supplies

E's feltboard was a piece of artists stretched canvas so that's what I bought, because I liked the look without a frame edge. 18 x 18 inches was a good size for T's little table.

I am fabric-challenged and can't sew, so venturing into the fabric section at Jo-Ann's was an adventure.  I finally found the "soft flannels", which were even on sale, and chose a pretty sky blue.  I liked the glitter flannel but it wasn't as fuzzy as the plain stuff, and I think the key to good stickiness is the fuzz.

I got a piece that was 24" long, which was more than enough.  I also found a pack of felt flower "buttons" in the trim section, which I figured would save me a ton of time cutting out flowers individually.

For the shapes, I bought a multi-pack of colored craft felt.  This is the same stuff they sell in 9x12 inch sheets, but the pack was a lot cheaper per piece.  It's soft fuzzy felt, not self-adhesive, and not the stiff kind.  If you want bigger pieces, Jo-Ann had bolts of it in the home fabric section.

Tools

Online tutorials suggested either hot glue or a staple gun to attach the felt to the board.  I chose the staple gun since it looked like fun and I've never used one before.  It's my new best friend. Special thanks to TJ for the staple gun lesson and troubleshooting.

I needed sharp scissors to cut the shapes out of felt, and I used my American Crafts Galaxy White Marker to trace/draw the shapes.  Many people use a Sharpie but I'm picky and didn't want dark lines on everything.

I used some cups and bowls to trace circles, and a ruler for straight lines.  Everything else was drawn (poorly) freehand.


Procedure

1.  Cut flannel to just larger than the canvas.  About 3 inches extra on each side worked well.  The edges don't have to be particularly straight since you're going to fold them in.

2.  Iron the flannel.  Mine had huge ugly creases in it and no amount of stretching was going to get rid of those.  Note to self: Don't iron on the dining table, even with a towel underneath.  I ruined the surface of the table when I used the steam setting.  Sad.

3.  Place canvas upside down on top of the flannel, centered.  Before you do this, make sure the surface is clean and dry!


4.  Fold the ends in so the frayed edges aren't exposed then pull the flannel tight and staple it to the wood part of the canvas.  I put the staples in about 2 inches apart.  You can use binder clips to hold the sections tight.  Do one side at a time and make sure you don't have any wrinkles or "bubbles" on the front. 

I'm especially proud of this corner!


 4a.  Pull the corners in tight, rolling frayed edges in.  I did this a little like wrapping a present, where I folded the corner over like a triangle (when I could- some sides just wouldn't cooperate!). 


5.  Repeat steps 4 and 4a for each side and corner.  Make sure you're always pulling the fabric tight.  Here's what it looked like when I finished all four sides.


Woot!  Now the board is done.  Step back and admire your handiwork!  If you have pre-cut felt shapes you can test it out now:


5.  Draw and cut shapes out of the soft craft felt.  The sky is the limit!  I made a variety of different sized and colored shapes, stems and leaves for the precut flowers, clouds, moon, a sun, stars, fish and trees.  I used the white marker to trace or draw the shapes and then cut them out.  Sharp, small scissors are helpful for detailed designs.

Because I was having so much fun being crafty, I found a cute box to hold all the felt pieces and added some letter stickers spelling "FELT" to the top.


Tips and Thoughts

  • I'm not sure if the flannel used for the board will pill over time and wear.  But it was easy enough to make the board that if it gets that much use, I can always make another.

  • You can make *anything* stick to the flannel if you put a small velcro dot on the back.  So I may experiment with cardstock or shapes and letters cut with my paper die cutting machine.

  • I don't know if the felt pieces will fray over time.  I didn't treat any of them with Fray-Check because it seemed too time-consuming.

  • When using the staple gun, make sure you hold it close to the front, and press down when stapling, so the staple ends up going in flat, without a gap.  A flat head screwdriver is handy to remove misplaced staples.

If I had to make another one, it would be a lot quicker.  The most time consuming part was cutting all the little shapes out of felt.  I probably cut more than T really needs - there certainly are more than she can place on the board at once!

T was pretty excited about it when she saw it and spent a good 20 minutes playing with it, even after a busy day at preschool when her focus had run out.  I expect we'll get at least a year's use out of it, if not more. 

If you make one, leave me a link in the comments!

Wednesday, May 02, 2012

For three strange days

We've only been back from Ireland for about 2 weeks which is surprising because in some ways it feels like AGES.

I was still horribly sick when I got back and visited my primary care doctor as soon as I could. She gave me the party line about how she couldn't really prescribe anything since I was pregnant, but gave me a tip that I could take Claritin or Mucinex safely. Fine, that helped a little.

The next day I had an appointment with my awesome OB for a usual checkup on BabyX', who finally allowed us to hear his/her heartbeat on the Doppler. She scoffed at the *3* doctors I saw who wouldn't prescribe anything and finally gave me sweet relief with a prescription for Zantac which cured the nausea and puking after the FIRST DOSE, and an inhaler which FINALLY got rid of the cough I've had for 4 freakin' weeks. I love my doctor.


this one goes out to the ones I love
So once I got the puking out of the way, I could resume real life, which meant getting back to work after nearly four weeks off. That's already tough, and it was even more of a party when I found out my job is going away and I need to look for a new one.

So as I am prone to doing, my inner project manager go to work and went into frantic job-search mode. I'm a pro at searching for internal jobs, having switched roles 5 times in the almost-10 years I've been there. The unsettling thing about this is that it wasn't my choice. I like my current team, and of course LOVE my part time schedule.

But after a week or so of freaking out and talking to people across the company about potential jobs, I'm not as unemployable as I thought. Let me tell you, it's awkward to bring up the fact that 1) I am pregnant and will start my maternity leave in October, and 2)I work part time and would love to keep it that way. I figured no team would want that.

Keeping the part-time schedule is going to be a challenge. Most of the interesting jobs I found are not ok with it. I had a few managers tell me outright "this team does not have good work-life balance." Yikes.

I *could* theoretically go back to working full time, because TJ is home now. But I also want to enjoy the time with him. Today we went to the Children's Museum in the morning, and it was a beautiful thing - easy parking, no crowds.

Our team got merged into a larger team, so I went to talk to some folks there. My last meeting was with the director of the team we got merged into, and I was a little nervous about that. And then she presented me with what sounds like a really awesome job. Project management. Bringing order to chaos. Helping other teams go through a process to release their code.

And not only that, she's totally cool with the part time schedule. I wouldn't have to go through the usual gauntlet of 5-7 interviews for this role. They need someone right away. I have the option to go full time later.

I know, I should be all "where do I sign up?", right? But I'm apprehensive. Every time I look for a new job, I worry about whether I'll make the right choice. Will this be a good or bad manager/management chain for me? Will this job disappear without warning in 8 months? Are there environmental factors that will make performance review a miserable thing? Is this work going to make me happy? Could I find a different position where I would earn a bit more? If I take this one, am I moving too fast? Should I consider more options just for the sake of time? (We did buy the first house we saw because we LOVED it...)

Does the "perfect" job even exist?

Sigh. I am grateful to have these questions, and not "how will I put food on the table?" Any words of wisdom here?

sharing is nice

Related Posts with Thumbnails