Showing posts with label birthday. Show all posts

Sunday, June 30, 2013

Project Life 2013: Happy Birthday To Me!

My birthday last week was low-key, but one of the best I've ever had.  TJ took the morning off to watch the girls so I could get my craftiness on.  For six whole uninterrupted hours. Granted I used some of it to shower in peace and get an eyebrow wax, but the rest was spent editing photos and making a Project Life layout.

Here it is:

June 3 - 16: Father's Day, lima bean plant, double cart @ Whole Foods

June 3-16: my favorite paper EVER, popsicles, Crazy House Project

Filler - I have a thing for clouds, lately.

Calendar card with pretties

I used the Citrus Twist June Project Life Kit, mostly.  I put the last several kits in the same Cropper Hopper Paper File (love these things for storing kits!), so I'm not sure which pieces belong with each month's kit.  But I do like mixing and matching things, so I'm not too worried about it.  I especially love the Amy Tangerine Yes Please tiny puffy stickers and their fun summery colors.

And you know what else matched, and was perfect for our popsicle-making process photos?  My MOST FAVORITE PAPER EVER.  

It's the Dreamy Days Polaroid-esque paper from American Crafts' Dear Lizzy Neapolitan line.  I got a sheet at my local scrapbook store (shout out to Ben Franklin Redmond!), and when I realized how much I loved it, I went back for more only to find they were completely out.  I was heartbroken, so I ordered a few sheets online from another scrap store.  Then I realized I *still* wanted more, so I ordered a 25-pack on Amazon. At the time, it was much more expensive than it is now, but I still consider it money well spent, to secure (aka hoard) that paper. I know, it's a sickness.

But now that I have so much, I'm not afraid to use it. It works so well to frame lots of little photos. And the pastel colors coordinated really well with the Citrus Twist kit colors.

You'll also notice that I embraced two colors I don't much care for - Pepto-Bismol pink and yellow.  I'm just not a fan but they worked well here, especially with that yummy pink and yellow ombre wide washi tape from a recent Studio Calico add-on kit. Standing in for bullet points this week on my summary are the hard-to-find Studio Calico tiny star wood veneers.

I've also found the perfect solution to adhering tiny wood veneer pieces and sequins, without having to deal with messy wet glue anymore.  Hooray!  I had no idea that Glue Dots came in a Micro size of 1/8 inch. I'll be buying more of these, for sure.  They are perfect for the tiniest wood veneer stars, little sequins and even small beads.

As you can tell, this was A Good Crafty Session. I had fun, and things came together as I thought they should.  I've been in a bit of a picture taking lull, so I'm hoping the Phone Photography class I signed up for in July will help me get my mojo back.

Here's a slide show of all my 2013 pages, including close-ups.  If you can't see it, click here to view my entire 2013 Project Life gallery.


Project Life @ The Mom Creative

Wednesday, June 26, 2013

Almost Wordless Wednesday: Best Birthday Ever

38 brought to you by
Raskog, Project Life, card made by T, breakfast cooked by TJ, Silhouette download card,
6 hours of uninterrupted mama time, dinner with family at Pomegranate and cake.

Saturday, July 07, 2012

Know when to walk away, know when to run

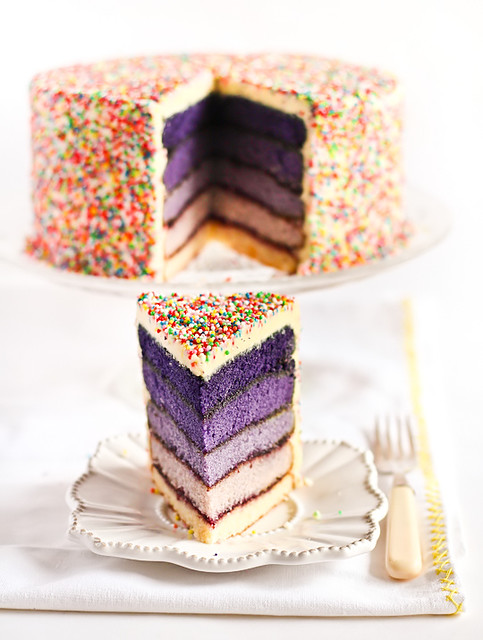
I saw this amazing cake and was smitten.  Head over heels, completely in love.  I knew it would be the perfect thing to bake for T's upcoming birthday.  She had expressed the desire for a "real cake" instead of cupcakes after seeing her friend H's fabulous Cars-themed cake at a party a few weeks ago.


Purple Ombré Sprinkles Cake
Purple Ombre Cake by raspberri cupcakes


I mean seriously, isn't it AMAZING? Rapturous? Beautiful? Dreamy? Perfect for a 3 year old's birthday party?

(Cue Richard Marx's crappy song from the 80s "Shoulda Known Better...")

I knew I'd need practice.  While I enjoy baking occasionally, I have never baked a layer cake and frosted it.  I figured I could practice a few times before September and figure out how to do this.  I'm a former chemist, and I'm good at following precise lab procedures, so this isn't much different, right?

The first indication of disaster up ahead was the fact that the only round cake pan I have is 10 inches, which is 2 inches bigger than the one the recipe recommends.  But since I was making fewer layers (only 3 instead of 5) I figured this might be ok.

But for each layer there wasn't enough batter to fill up the pan, so they ended up being lopsided flat pancakes once baked.  Sigh.  Also the second and third layers weren't different enough color-wise after baking (though the batters looked different going into the oven!).

I still figured I could practice on the layering and frosting parts so I kept going.  This took me all day.  And I chose the one day it hit 80 degrees.  Not very smart, huh? 

I bought a local brand of raspberry jam for spreading between the layers and that was pretty amazing - no big blobs of raspberries and easy to spread. 

The vegan chocolate "buttercream" frosting was off in texture, possibly because of the heat.  T is still allergic to dairy unless it's been baked, so frostings need to be made dairy-free for her.  I had great luck a few weeks ago with the plain vegan buttercream, but not so much with today's chocolate version which was sort of grainy and wouldn't get smooth or fluffy despite lots of mixing and playing around with the ingredients.

The end product looked, well, homemade.  Respectable for a first try, and the almost-ombre layers did look pretty cool when I cut into the cake.  But the cake was super-sweet and super-dense, probably due to the thin cake layers and all that jam and frosting.  (And I don't have much of a sweet tooth to start with.)


I think a birthday cake should look magical (like the original!).  I want my birthday girl's eyes to light up when she sees it, knowing that gorgeous cake was made just for her.  I get that when she's 30, she'll be grateful that her mama went to the trouble of making a homemade cake, but that's not how it works when you're 3.  You want the pretty one.

So without regrets, we'll go to Whole Foods and talk to them about cake options.  Sometimes it's better to leave important things to the professionals.

Tuesday, June 26, 2012

Just another day

I'm at an age where I'm supposed to hate birthdays or at the least, downplay them for fear of "getting old".  No way man!  I LOVE my birthday.  It's my own personal holiday.  I can be a diva.  I get new stuff.  People bring me cake.  I typically take the day off from work. What's not to love?
So here I am, at the ripe old age of 37, 6 months pregnant and wearing my awesome handmade birthday crown:


Yep, my fabulous husband and fabulous daughter made me a fantastic crown to wear for my birthday.  I wore it to work.  I'm wearing it at home.  T also suggested to TJ that my birthday present should be getting my nails done.  I don't know how/where she came up with that, but we were surprised at what a good idea it was.  So I'm now sporting glittery fingernails and bright almost- BMW M3 blue toes.

Birthdays are often about a new gadget for me: iPhone, iPod, camera, whatnot.  In fact Birthday iPod 2006 has been pressed into (underutilized) service as T's sleepytime "rain sounds" machine.  This year we got a new computer for our living room so that T can watch the occasional DVD there.  Plus we can use it as a digital photo frame/slideshow thingy when we're not watching anything and also stream our music through it.  It's supposed to show up today - woo hoo!
Birthday Week also has included a trip to Canlis, most years since 2005.  This year is no different. Hooray!  Today is a Good Day.

What about you - do you celebrate your birthday or try to ignore it?

Saturday, July 23, 2011

Birthday Card for a Musician - Experiment 5

Yep, I know it's been a looong time since the last post.  Months, in fact.  But I haven't been idle.  I've been chasing around a toddler, starting a new job, and squeezing in a crafty moment wherever I can.  Mostly that's come in the form of supply shopping, but I've made several cards, too.

Back in February, my friend Jenna had a birthday.  We had been lamenting about the fact that we rarely even had time to get a haircut because of the aforementioned toddler-chasing, so I figured the perfect present would be a gift card to a local swanky salon chain.  She just used it a month ago!

I knew I had to make a card with a pocket, similar to the New Mama card I had made.  What I love about making cards individually by hand is that I can personalize each one for the recipient.


Stuff:

I couldn't find all the exact supplies I had used, but these are similar.
Marvy Uchida lever craft punch - 1.25" star
Stampin Up' Curry dye ink pad
A2-sized DCWV textured yellow card base & white envelope
American Crafts Mini-Marks Rub-On Transfers-Celebration Book 2, Color
EK Success Inkadinkado Music Sheet Wood Stamp
Yellow 6X12 Alphabet Stickers (Studio Calico)


How:


1.  I had a new rubber stamp that was a bunch of jumbled sheet music scores, perfect for backgrounds and perfect for my musical friend.  I wanted a subtle tone on tone look, so I used a mustard colored dye ink from Stampin' Up on a pre-cut A2 sized dark yellow card base and stamped randomly to cover the card, re-inking each time.  I let this dry for about 10 minutes.

2.  Using the star punch, I made 5 stars from brown shimmer cardstock from my scrap pile.  I used lowercase cardstock letter stickers in a sparkly yellow that matched the card base for her name.

3.  I arranged the stars in a sort of constellation pattern and stuck them on the card with pop-dots to give them a 3-D look.

4.  My beloved Minimarks rub-ons in a dainty 'happy birthday' make up a border for the bottom of the card.

5.  I cut out a small strip of dark yellow cardstock for the pocket and stuck the sides and bottom down with double sided tape.  I used the same pack of rub ons to add the word "wish" in a corner of the pocket.  I also cut down a border sticker to add a bit of color inside the card, to match the gift card a little better and make it look less plain on the inside.

Tips:


  • Figure out a color scheme first.  That'll narrow down your choices of "stuff" to put on the card.
  • Lay out all the pieces before sticking anything.  Or use reusable adhesive, similar to the stuff that Post-It Notes use.
  • Heat-set the stamped background with a heat gun to be sure the ink is dry and doesn't smear.  Dye (water-based) inks dry pretty quickly, but pigment inks can take a lot longer to dry, and the stamping will smear if it's not completely dry.
  • Every now and then, put the card down and sit back and look at it.  Does it look "right" to you?  Is there a big empty space somewhere?  Does it need *something* more?
  • I like to add a couple of embellishments inside the card so it doesn't look too plain compared to the elaborate work I've done on the front.
  • When making pockets for gift cards or other thin items, remember to only tape or staple three sides of the pocket so that one side is open to slip the item in.  This is a total "duh" tip, but I can't be the only one who pasted the whole thing down and realized my mistake, right?

This was another fun project that just took a couple of hours from start to finish.  I spent most of my time trying to figure out *what* to do, and actually assembling this simple card was pretty quick.  More to come, so stay tuned!

Friday, February 25, 2011

Experiment 4 - New Baby Girl Card

A friend from work had a baby in January, and I found the perfect (totally impractical) gift for her. These shoes from pink2blue on Etsy are breathtakingly gorgeous in person.

I saw them long after BabyT was too big for them, so I was glad to have another person to buy them for. Those gorgeous shoes could only be presented with an equally cute card, so I worked hard on this one. It was a great project because I just sat down one evening and decided I was going to make it, and finished it in one sitting. That's what I love about making cards - they can be completed in a short time.


MATERIALS

TOOLS

METHOD
1. I cut strips of patterned and plain pink cardstock to fit the width of the card, in different heights, and used the decorative scissors on the piece at the bottom.

2. I stamped 'Welcome Baby' in brown pigment ink onto plain pink cardstock cut in a circle, then quickly poured on embossing powder and tapped to remove excess. I used a paintbrush to get rid of the stray bits (as well as I could), then hit it with the heat tool for a few minutes until the powder melted and became shiny.  It's a pretty dramatic change, so keep going if you don't see it happen.

3.  I mounted the embossed circle onto a dark pink patterned circle, and then mounted that onto a square of textured cardstock with 3 of the 4 corners rounded (I didn't want to be too symmetric!).

4.  Using the double-sided tape, I attached all of the paper strips to the front of the card, then the embossed piece.  I spelled out 'ELLA' using the cardstock stickers, and then used craft glue to stick the hydrangea cutouts to the card.

5.  The card didn't quite look "complete" so I added a row of faux brads along the top strip of paper.
SUMMARY

I'm quite pleased with how this turned out.  I had to restrain myself from using a ton of different pink patterned papers (I've got quite a stash) and stuck with the very cool crown print from my friend Jenn's scrap pile, and then a very subtle dark pink floral for one of the circles under the 'Welcome Baby' stamp.

I obviously can use some practice embossing - there were still stray bits of powder that wouldn't come off, making the design look a little "fuzzy" after embossing.  I tried using a plastic tray to easily recover the leftover powder, but it was very sticky plastic so I ended up just throwing out a bunch of it.  Next time, a plain piece of paper might work better.

The inside of the card was too plain - I probably should have used a bit of the patterned paper to tie it together a bit more.  Also, I cut out all the pieces first so I could move them around to find the best layout.  It's hard for me, because I get anxious to just finish it, but it's really better to save the tape and glue for the last step so I can make last-minute design changes.

My friend J liked the card and the shoes, so it's all good.  Thoughts from the Peanut Gallery?  Was this too traditionally girly?

Sunday, February 06, 2011

Experiment 2 - Baby Birthday Party Banner

As part of BabyT's first birthday papercraft festivities, I wanted to create one of those cool birthday pennant banners.  But all the ones I've seen online were made from fabric, and I didn't have enough time to learn how to sew.  I thought there must be a way to make one from all of the cool scrapbook paper I had.

So I turned to my trusty friend, The Google, and did a little searching. Just entering 'birthday banner' yielded a bunch of shops with very cheapy-looking vinyl banners and some not very helpful websites with duplicated content. Then I got creative and searched on 'birthday banner tutorial paper' and found Katydid and Kid's most excellent tutorial.  Since she already has lovely pictures and step by step instructions, I'm keeping mine short.

MATERIALS


  • Solid colored cardstock

  • Patterned scrapbook paper  (coordinating with each other and the cardstock, but different patterns)

  • White 8.5" x 11 printer paper

  • Curling ribbon

TOOLS

METHOD

  1. I searched on dafont.com to find a cute outline font that had upper and lowercase letters.  That site is truly addictive so set a timer, or you'll find yourself still looking at fonts three hours later.  

  2. I entered the text into Microsoft Word and increased the size so it would print two letters per page.  I cut out each letter. (Tedious!)

  3. Using the circle cutter, I cut 6" circles from the cardstock - one per letter plus a couple of extras,  and then cut slightly smaller circles from the patterned paper (5 inches-ish).  (Very tedious!)

  4. I glued the letters onto the patterned paper, then used double-sided tape to tape the patterned paper to the cardstock circles.

  5. I, and my friend Kim who volunteered to help, colored in the letters with the 96-pack of Crayola crayons I've been moving from house to house since college.  I was glad to finally use them for something!  I suppose BabyT will eventually inherit them, so it's all good.

  6. I punched two small holes in each circle, and used curling ribbon to tie them together.  I finally learned how to use a butter knife to make the ribbons curl, and was mildly successful in getting cute ribbon curls between each letter.

  7. I drafted the help of my fabulous husband to hang the banner in our living room, using thumbtacks and embroidery floss.  Everytime T saw it she would point and giggle.
Top and right photos by Kristi Lloyd Photography


SUMMARY and LESSONS LEARNED
This was another project that wasn't technically complex, but took me several days to complete it. Being a mama really cuts down on my uninterrupted crafting time!

  • This time I did use the 'assembly line' system and cut all letters, then all circles, then glued, etc. That made the process go a lot faster. I'd definitely spend less time browsing for fonts - I think I ended up back at one of the first ones I chose anyway.

  • I would have done a better job at coordinating the papers and the crayon colors with each other - I got too much of an eclectic mix of colors and patterns.  I was trying to avoid being too "matchy matchy", but as a result, it didn't come out very cohesive.  Maybe limiting it to a few colors would have been a good start.

  • Next time I might think about printing the letters in color, or using my fancypants Silhouette SD machine to cut the letters out of colored cardstock.  The coloring was fun, but unnecessary.

I've repurposed the banner so that the 'happy' part is hanging in my craft room, and I plan to hang up the 'Trillian' part in her room.  Is this something you might try making?

sharing is nice

Related Posts with Thumbnails