Showing posts with label experiments. Show all posts

Wednesday, September 26, 2012

We are in love

I am a casual photographer.  I've had my own camera since junior high, when my dad got a nice compact film camera from a colleague in Japan, and generously handed it over to my excited 10-year-old self, because he had a *really* nice Canon himself.

I used that verysame camera through middle school, high school, college, a trip to India, grad school and the first couple of years of work, until 1998 when I finally joined the digital world and bought a 5MP HP digital point and shoot camera that was ENORMOUS. 

And even then, I didn't take TONS of photos, but enough to document interesting stuff here and there. 

And then we got a dog.


The number of photos I took vastly increased, and most of them were of The Peanut.

Then we got another dog.


When we got engaged, I knew I really wanted nice photos of our wedding, and that was my top priority.   This got me hooked on professional photos.  Not the "dress up in sweater vests and haul the kids off to Sears" but candid, photojournalistic awesomeness at a location of our choice.

Photo by Bradley Hanson


Since we've had BabyT, we've gotten professional photos every 6 months.  Luckily for us, Baby X' will be born around the same time of year so we can keep that same schedule for a while, corresponding to birthdays and half-birthdays.

Photo by Kristi Romain


But since having T I didn't want to miss all the "in between" times.  Babies change a lot in 6 months, so I stepped up the picture-taking.  I had an ambition to do a DailyBaby shot every day of T's first year, but didn't quite make it everyday.  Still, I'm only missing a handful of days so I'm pretty proud of that.  Mind you, not all of them have been uploaded online but that's a different problem of mine ;)

Doing Project Life this year has made me even more motivated to "capture the everyday".  I've finally had some time to go back to my 2011 photos and process them, and I've noticed a definite improvement in my photography since then.  Practice really does help even though I wasn't actively trying to get better.

I'm a gadget girl.  I've wanted a fancypants DSLR camera since 2009 when we upgraded my 2005 teeny tiny PowerShot to the more powerful, but still point-and-shoot, Canon S90.  I chose the S90 because it was much smaller than a DSLR and I figured I'd  be more likely to toss that in the diaper bag for outings.  I was right.

But the DSLR bug was in my ear.  When I was looking into photography classes to learn some technique, most are geared towards DSLR owners.  My friend Laura, who is amazingly talented, is so enthusiastic about her camera and lenses that every time she'd mention it on her blog, it reminded me that maybe I should look into getting a DSLR.  A lot of the scrapbookers who frequent forums I read are also avid photographers, as are many of my real-life friends.

So one day, with idle hands performing the devil's work, I read tons of reviews on Amazon and finally plopped the Canon Rebel T3i DSLR onto my Wish List.  Which is private, and no one ever looks at it but me. But it was there. Staring at me. For an entire year.

But it's a BIG purchase and I always had an excuse for why I couldn't or shouldn't buy it.  After seeing the pro photos from T's recent birthday party, and noticing that one group of them had this "look" that was different, and really, really awesome, I couldn't wait any longer.  I wanted to learn how to take photos like that, with that cool blurred background and the subject super-sharp in the foreground. 

It's a testament to my self-restraint that I was able to wait so long, really.  So one night last week I put up an innocent query on Facebook: did any of my friends have a "starter" DSLR they were looking to sell. Because I'm friends with a lot of engineers and scientists, I knew there was a similar gadget-love going on, and people upgrade their gadget goodness ALL.THE.TIME.  Within 5 minutes, a coworker posted that he was looking to sell his Canon T3i.

Uh, yeah.  The same *exact* camera that's been on my wishlist for a year.  Is that the Universe talking to me or what?  (Ok, I was looking for an excuse, but that was really too good.)  The nice thing about staying with Canon is that the menus and controls are pretty similar to the S90. 

So I jumped in feet first and bought it with the money I've been hoarding from my Etsy shop revenue.  We're MFEO, right?  (Meant For Each Other, for those who haven't watched Sleepless in Seattle in a while.)


And I am SO in love.  By just upgrading the camera, my photos have gotten a huge boost.  Imagine what could happen if I actually learned some things, and *practiced*?!  The mind boggles.


The other thing I've discovered - my friends are a knowledgeable and generous bunch.  I've gotten tons of useful tips on lenses and technique that would have taken me ages to figure out myself.  They've given me lots of links to bookmark for later, classes to consider, things to try on my camera, and the confidence to go forth and shoot and learn.


Given the timing, I can't jump into taking photography classes right now, but hope to squeeze one in sometime during my maternity leave.  In the meantime, I'll have a lot of opportunities, and a new subject on which to practice.  I am SO excited, peeps!


Wednesday, August 01, 2012

And the winner is...

BabyT helped me pick the winner for my first ever giveaway, of 3 rolls of washi (and washi-like) tape.  I punched circles from a piece of scrap paper (our hotel receipt from our Portland trip), wrote everyone's name on it, folded them into quarters, and put them in a big purple bowl from IKEA. 

T caught on pretty quickly about her job, picked one, and asked me to read the name.  Smitha is the lucky winner, which is awesome since I'm always using the free Project Life printables that she designs. 

Thanks to everyone who entered!  I had 11 entries counting Smitha's double entry for Tweeting about the contest.  Not too shabby for a first one!

Also, in case you can't tell, I am LOVING Instagram.  I know it's overdone, and crazy that we are using all these filters to make our photo quality worse, but it's so fun.

They make Project Life a little easier too, because I've already chosen the good shots (or good enough) and processed them.  So all I need to do is print them and stick them in the album. 

I also found a great deal on 4x8" Canon photo paper, so I can now print two of these Instagram shots on one sheet instead of wasting part of a 4x6" sheet. 

I still use my regular camera a lot, but love the flexibility of Instagram, especially since I always have my phone with me.  I'm so glad they decided to release an Android version!!


Saturday, July 07, 2012

Know when to walk away, know when to run

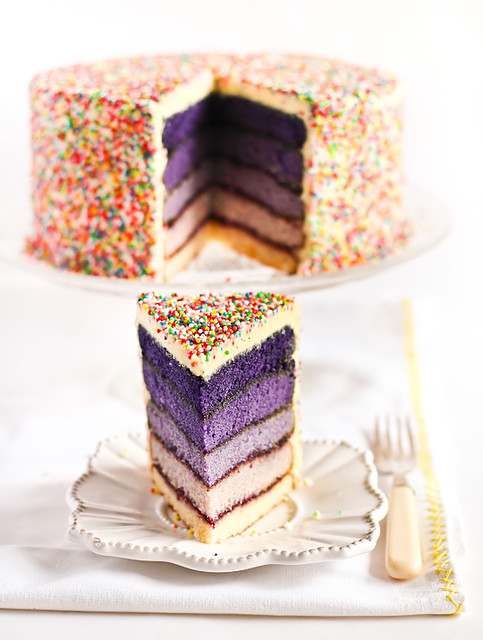
I saw this amazing cake and was smitten.  Head over heels, completely in love.  I knew it would be the perfect thing to bake for T's upcoming birthday.  She had expressed the desire for a "real cake" instead of cupcakes after seeing her friend H's fabulous Cars-themed cake at a party a few weeks ago.


Purple Ombré Sprinkles Cake
Purple Ombre Cake by raspberri cupcakes


I mean seriously, isn't it AMAZING? Rapturous? Beautiful? Dreamy? Perfect for a 3 year old's birthday party?

(Cue Richard Marx's crappy song from the 80s "Shoulda Known Better...")

I knew I'd need practice.  While I enjoy baking occasionally, I have never baked a layer cake and frosted it.  I figured I could practice a few times before September and figure out how to do this.  I'm a former chemist, and I'm good at following precise lab procedures, so this isn't much different, right?

The first indication of disaster up ahead was the fact that the only round cake pan I have is 10 inches, which is 2 inches bigger than the one the recipe recommends.  But since I was making fewer layers (only 3 instead of 5) I figured this might be ok.

But for each layer there wasn't enough batter to fill up the pan, so they ended up being lopsided flat pancakes once baked.  Sigh.  Also the second and third layers weren't different enough color-wise after baking (though the batters looked different going into the oven!).

I still figured I could practice on the layering and frosting parts so I kept going.  This took me all day.  And I chose the one day it hit 80 degrees.  Not very smart, huh? 

I bought a local brand of raspberry jam for spreading between the layers and that was pretty amazing - no big blobs of raspberries and easy to spread. 

The vegan chocolate "buttercream" frosting was off in texture, possibly because of the heat.  T is still allergic to dairy unless it's been baked, so frostings need to be made dairy-free for her.  I had great luck a few weeks ago with the plain vegan buttercream, but not so much with today's chocolate version which was sort of grainy and wouldn't get smooth or fluffy despite lots of mixing and playing around with the ingredients.

The end product looked, well, homemade.  Respectable for a first try, and the almost-ombre layers did look pretty cool when I cut into the cake.  But the cake was super-sweet and super-dense, probably due to the thin cake layers and all that jam and frosting.  (And I don't have much of a sweet tooth to start with.)


I think a birthday cake should look magical (like the original!).  I want my birthday girl's eyes to light up when she sees it, knowing that gorgeous cake was made just for her.  I get that when she's 30, she'll be grateful that her mama went to the trouble of making a homemade cake, but that's not how it works when you're 3.  You want the pretty one.

So without regrets, we'll go to Whole Foods and talk to them about cake options.  Sometimes it's better to leave important things to the professionals.

Sunday, May 20, 2012

Cooking the Books: Mi Comida and Mexican Pasta Salad

My friend Di, who I met in college, is having a blog party where we post about a dish we cooked that was inspired by a book.  She gave us a heads up a few weeks ago and I racked my brain to think of something literary and cool.  I came up with ... nothing.

But T and I have been learning Spanish together and one of her first Spanish books was Mi Comida.  It's got a bunch of cute paper collages of food with the Spanish word for it.  Many of these words are ingredients in the Mexican Pasta Salad from the Moosewood Restaurant Low-Fat Favorites cookbook. Examples: los guisantes (peas) and los fideos (noodles).  Tenuous connection, I know :)

I've been trying to find something we can pack for T's lunch other than the sunflower seed butter on whole wheat sandwich we give her nearly every day and I thought this pasta salad might do the trick.  It's not "spicy" in the toddler sense, it has pasta and beans in it which she loves, and I figured I could sneak in a few veggies and some tofu as well. 

It also helped that I enlisted T in the cooking process, and she was a surprisingly good helper.  I had to stop her from eating the black beans and olives out of the bowl directly, but distracted her with a bunch of tofu cubes which she ate happily for the first time ever.

I modified the recipe to add peas, which I knew T would eat, and didn't add any tomatoes because I knew she wouldn't eat them.  I had to throw away the yellow bell pepper I planned to use because it was moldy (so sad!).  I added 4oz of extra firm high protein tofu cut into tiny cubes and a little extra olive oil because I'm not concerned about being low-fat.  I used the Barilla Plus higher protein pasta to sneak a little extra protein into all of us.

Best kitchen helper ever!


Mexican Pasta Salad
adapted from Moosewood Restaurant Low-Fat Favorites

7.5 oz Barilla Plus Farfalle pasta
1c frozen corn
1c frozen peas
2 green onions, minced
1 15-oz can black beans, rinsed and drained
1 4oz can sliced black olives, rinsed and drained
4-6 oz extra firm high protein tofu cut in tiny cubes
1/4c olive oil
juice of 1 small organic lime
juice of 1 organic lemon
3 tsp ground cumin
3 tbsp chopped fresh cilantro
1/8 tsp black pepper

  1. Boil water in a large pot with some salt.  Cook the pasta for about 8 minutes, then add the frozen corn and peas, and cook for another minute or two after it comes back to a boil.
  2. While the pasta is cooking, combine the green onions, black beans, tofu, olives, olive oil, lemon juice, lime juice, cumin, cilantro, and pepper in a bowl large enough to hold the finished salad. Mix well and let stand at room temperature so the flavors can mingle nicely.
  3. Drain and rinse the pasta/veggies with cold water and let cool.
  4. Add the pasta, corn and peas to the bowl with the beans and tofu and mix well.  Taste again and add more cilantro and cumin to taste.  If it seems too dry, add a bit more olive oil.
  5. Chill in fridge and serve.  It tastes better after it has some time for the flavors to mix.
I bet this would also taste good with some fresh pico de gallo mixed in (either homemade or high quality store bought) but I can guarantee that my toddler won't eat it with tomatoes visible.

We eat this as a main course, but it would also work as a side dish for burgers or at a cookout.  It's great for packing in lunches because it tastes good at room temperature and doesn't require heating.

Thanks again to Di for hosting this blog event!

Monday, January 30, 2012

Holiday Card Mini Album - Experiment 9

Every January, I suffer tremendous guilt when throwing away the cute photo cards we received from friends and family in December.  The thing is, I'm not really sentimental, and I'm not a "saver".  So I usually recycle what I can and throw the rest out.

A few years ago, I noticed my friend Jenn add the photos into her scrapbook pages.  Brilliant, but I couldn't figure out what I would do since I'm not (yet) a scrapbooker.

This year, I saw a link to this cute idea to stick them on standard binder rings from an office supply store.  Hooray!  But I wanted to do more.

For Christmas, I bought myself the Zutter Bind-It-All tool (thank you TJ!).  It allows you to create little mini albums or notebooks.  The tool punches the holes for the binding, you thread the pages onto metal wires made for this purpose, and the tool squishes the wires closed, giving you a cute little bound book.  You don't have to make just standard little notebooks or albums with pages all the same size.  You can literally bind *anything*, as long as it's not too thick/heavy for the machine to punch.

THAT is what I wanted to use for saving my Christmas 2011 photo cards.  I wanted to create cute little covers and make an album out of it.  I toyed with the idea of making an actual Christmas mini-album and interspersing the cards with our own pictures and text, but knew I'd never actually finish it, so I decided to stick with binding just the cards.

Here it is (click to see a larger version):


It took me a little while to figure out the binding tool, but thanks to Zutter's instructional videos on YouTube, it was a lot easier than the manual made it seem. 

This was a surprisingly easy project.  It even has an eco-friendly angle, because the cardboard I used for the covers was the backing that USPS sends me for their "Stamps by Mail" shipments.  Every sheet of stamps has its own huge piece of cardboard and is then shrink-wrapped.  Great if you're a collector, I guess, but it just seems really wasteful.  So I'm happy I could reuse some of that cardboard.

My Xyron XRN900 was perfect for covering the cardboard with cute cardstock.  It covers paper with a really strong adhesive all the way to the ends, so for applications where you need some durability and don't want edges lifting, it's really great. I scored mine for $20 on Craigslist and it has been *awesome*.

After making the front and back cover - cute patterned paper on the front and a nice acid green cardstock inside - I punched holes in all of the cards.  Since they were different sizes, it was a more difficult project than I probably should have started with, but I like a challenge.  Well, I mostly like it when it's done and I've kicked its butt, but I digress.

Then I threaded the covers and pages onto the O-wires.  I found that I needed to punch some additional holes in some of the cards to get them to fit well.  Squinching the O-wire (my technical term) was more difficult than I expected.  The first one got mangled and the pages wouldn't turn.  I tried again, after watching some more YouTube, and got a better (though not perfectly round) result the second time.  I need practice, especially for longer projects that are wider than the tool itself.

I tied some little scrap bits of red ribbon to the binding to make it look more festive.  At first I thought it just looked messy, but it's growing on me.  Especially if I line up all the little ribbon bits in a row.  Yeah, I'm weird like that.  I added a quick "2011" title on the front with some stickers and scrap cardstock, and wrote a little note on the inside front cover about what was inside.

Once I get better at using the Zutter tool, I think I could complete this in under an hour.  So easy! 

Monday, January 02, 2012

Yay - Submission to CARDS Magazine - Experiment 8

One of the categories for the June 2012 submission call to CARDS was "mini cards".  I figured that might be a good one since I was pressed for time.  After all, the smaller the card, the less "stuff" you need to put on it, right?

As I was falling asleep after making the first card, I had an idea for the second one.  Let me tell you a little story...

My college roommate K was most certainly cooler than I was (still is!).  She let me borrow her clothes, especially when we went out and I needed something edgier to wear.  One of the items I frequently borrowed was a black tank top.  But not just any black tank top - it was styled like a corset, with satin ribbon lacing.  Since it wasn't an *actual* corset, it didn't have those annoying straps for garters and whatnot, and the lacing was in the front rather than the back.

At some point, K realized I was borrowing it for pretty much every outing, and she just gave it to me.  I wore it out.  In fact, I just recently gave it away (finally!).

I wanted to make a card inspired by this corset lacing.  I have a ridiculous amount of ribbon in my supply stash and struggle with how to use more than a few inches at a time as a border or small accent. 

This was an idea I needed to try first, to see if it would really work.  I measured and punched a few paris of holes in scrap cardstock and tried lacing it up with 1/8" ribbon.  It looked pretty cool.  

In a recent Craigslist score of a sticker binder and a bunch of miscellaneous supplies, I found some super-cute Basic Grey patterned paper that had already been matted onto white cardstock.  Two of my favorite color combinations are dark pink and acid green, and brown and acid green.  I found some Stampin' Up cardstock in a delightfully acidic green that looked perfect for the card base.

Since this was a simple card, I needed the circle with the sentiment to stand out.  At first I wanted to stamp and emboss it with the new opaque white ink I bought, but realized quickly that I don't have white embossing powder, and the clear powder didn't make it stand out enough.  (Another thing I'm glad I tested on scrap cardstock first!)

So I settled on letter stickers instead.  But the white chipboard stickers looked a little too plain and had some imperfections on them.  What better way to fix that than with glitter?  Oh, I love me some glitter.  I grabbed my Zig glue pen (OMG love) and my Martha Stewart super fine glitter and got to work.

I put in a silver eyelet to strengthen the hole in the circle and give it a more finished look and tied that piece on with a simple knot.  All in all, it was a pretty quick card to construct, but the trial and error of figuring out the mechanics was what took longer.

Tips and Tricks
  • When using embossing powder and a heat gun, you'll want to stop before it's done.  Don't - there's a very definite point when you'll see the powder melt and get shiny.

  • For both glittering and embossing, you don't need a fancy tray to collect the excess.  Just use a clean sheet of white printer paper.  Then you can bend it and pour the rest back into the jar.

  • You can remove extra bits of embossing powder and unstuck glitter with a small paintbrush.  Be gentle so you don't screw up the wet parts of the design.

  • For projects requiring a LOT of ribbon like this, cut twice as much as you think you'll need.  You can always use the scraps later if you cut too much, but if it's too short, it'll just be frustrating. 

I submitted both cards to the magazine online in the wee hours of 12/31.  It was an awesome way to ring in the New Year, especially since the Hubby and BabyT were both asleep well before midnight... 

Thoughts?  Critique?  Should I have put eyelets in the little holes to make it look more finished?  Too plain?  Too busy? 

Sunday, January 01, 2012

I've Got Sunshine - Submission to CARDS Magazine - Experiment 7

Happy New Year!! As I mentioned in my last post, one of my Mondo Beyondo dreams is to get a papercraft published in a magazine.  My top choice is CARDS Magazine by Northridge Publishing, because it is so darn pretty. 

I spent some time wishing I could do this, without taking any concrete action. Not surprisingly, it's very difficult to get published without actually *making* and *submitting* an item first.  So during this long weekend, I finally printed out the submission guidelines, and found out (eek!) that the submission deadline for the June 2012 issue is TODAY.

They listed several different categories, including Father's Day, Friendship, and Mini Cards.  Each month they also have a "style challenge" which gives you a few colors to use and a theme.  They also have a "sketch challenge" which has a schematic drawing of a card layout that you use as a starting point.

Since I only had 2 days to work on these, and my whole regular life to attend to in the meantime, I set a reasonable expectation of making 2 cards for this Call for Submissions.  (Sounds like a scientific conference, right?)

The Style Challenge looked like fun - the theme was "clouds" and the colors light blue, navy and yellow.  I figured the obvious choice would be to do some kind of cloudy sky scene with a big yellow sunshine so I tried to find a different approach.  I had some of the lyrics to "My Girl" running through my head - "I've got sunshine, on a cloudy day..."

I took that as inspiration and thought about what else could be yellow, and came up with a couple of things:  a big happy balloon, a bird?  And then it came to me - an airplane!  It had a more techie vibe and I thought it might stand out a little better, since a lot of the cards they publish are very feminine in theme.

First, I cut out the clouds and airplane on my wonderful Silhouette SD diecutting machine.  I wanted the airplane to look "metallic" so I found some bright yellow glossy cardstock which worked well.  I also used vellum to give the clouds some additional translucence and dimension.

I struggled a bit with the actual layout.  I had all the pieces I wanted to incorporate but got a little "stuck" on where to put them. So I turned to my talented Design Consultant, aka TJ, and he made some suggestions that were excellent.  In fact, it was HIS idea to stack up the cloud pieces so they looked more "fluffy" - his exact word.  Dang, he's good.  (Am I ruining his street cred now?)

Nearly all the cards in the magazine are matted - they have an extra piece of paper on top of the card base to "frame" it, which makes it look more professional.  But I didn't want to cover up most of the lovely silver cardstock.

I had a brainwave to make a HUGE cloud out of the navy polka dot paper, which contrasts really well with the super-bright airplane.  And the new metallic tissue paper I bought from Target's post-holiday clearance section made a perfect set of "windows" for the plane.

This was a really fun project - I loved having some contraints to work with.  It let me jump right into problem-solving and idea generation, rather than being paralyzed by the sheer volume of what I *could* do. Yes, I'm a total nerd.


Tips and Tricks:
  • I've said it before, but it's worth repeating A LOT - do not glue ANYTHING down with permanent adhesive until you are absolutely sure of your design.  A pencil can help mark placement, or you can use high quality removable adhesive for a temporary layout.

  • Remember you're working with paper, and it shows wear very easily.  Try to handle each element as little as possible and don't move them around a ton, esp if you're using removable adhesive to test layouts.

  • Buy special invisible tape for vellum.  I thought I had some, but turns out I didn't and needed to make a small design change to use silver brads instead of just taping down the "HELLO!" sentiment.

  • Pigment ink stays wet for a long time (the metallic stuff seems even worse) - hit your stamped image with a heat gun tool to get it to dry faster.  Do not handle it more than you need to.

  • If you're going to ink/trace/chalk paper edges, do it before you glue it onto something.  So much easier and cleaner that way.

  • Spend some time thinking or sketching the look you're trying to achieve BEFORE dipping into your awesome supplies.  Craft supplies are great (I should know) but also very distracting.  If you're not careful to stick to your vision, you can get sidetracked and end up with an incoherent design that looks like your embellishment collection vomited.  (Not that this has ever happened to me...)

  • Projects always take twice or 10x as long as you think so if you're under a tight deadline, start early and scale back your expectations of how much you'll get done. 

I may depart from my usual "Materials and Methods" section in my posts, because I realized it was making me *not* want to write about my projects.   It was starting to seem like a chore.  I like writing about the inspiration for the card, who it's going to, and of course, what I learned from doing it.  If you have questions about how I did something or what supplies I used, please let me know in the comments and I'll be happy to answer!

I'm proud of this card, even though it likely won't get picked for publication with the hundreds of submissions (from far more experienced papercrafters than me!).   It enabled me to get started with the process, to practice using the Silhouette a little more, and use someone else's defined parameters to make something uniquely mine.

But, maybe, just maybe, there's a teeny tiny chance.  And if you believe that, then please keep your fingers crossed for me ;)

Friday, December 02, 2011

Christmas Sweatshop Craft 2010 - Paper Photo Ornament - Experiment 6

Now that it's December, I feel like it's ok to post Christmas-related projects.  I didn't want to be one of those people pushing Christmas before the turkey leftovers have been consumed.

Last year was when I started collecting papercrafting supplies, at first just to finish BabyT's baby book (which is *still* not done and she's 2 now). With all those supplies, I also wanted to make something little that I could slip into our holiday cards.  Since I love sending regular greeting cards rather than the one-panel photo cards everyone else sends, I figured this craft should include a small photo of us.

On the very excellent blog Christmased, someone commented about a family tradition to have a crafty project that they all participate in, to give out to others. Inevitably they'd end up working on it till the wee hours, hence the name "Christmas sweatshop craft". I love that, so I'm stealing it for my title. 

I decided to make small paper ornaments that people could hang on their Christmas trees.  Since it had to fit inside a card, it needed to be flat, so I decided on a round shape with a little cap to look like the top of an ornament ball.  I had to make at least 45 of these, to fit my Christmas card list.  Since I was so excited about this project, I started in early December, so I didn't go into panic mode during this project.  Hooray for being a project manager in real life.  Sometimes it does pay off in unexpected ways.

Paper photo Christmas ornament 2010
 This was pretty easy to make, and would have been even easier (and neater!) if I had used my Silhouette machine to cut out the ornament circles.  I just wasn't thinking about it at the time, since my machine was brand new!
  1. Using the Martha Stewart Circle Cuttermanual circle cutter, I cut approximately 3.5 inch diameter circles - for each ornament I cut one from holiday themed patterned paper and one in plain cardstock.
  2. I printed the photo I wanted using the Windows Photo Viewer.  I printed them wallet-sized on 8.5 x 11" photo paper and cut each one to about 2 inches square. 
  3. I used my Fiskars squeeze corner rounder punch to round the edges of each photo.  (This takes a while when you have 45+ photos!).
  4. I stuck the patterned paper circles to the cardstock circles using Mod Podge Decoupage Glue. 
  5. I used double stick tape to adhere the photo to the patterned paper side of the ornament (once the glue was dry on the ornaments, about a day later just to be sure!)
  6. I used the Silhouette machine's software to design the ornament top - it's just a rectangle welded to a circle, with another circle inside.  I then had it cut out all 45 of these, while I sat back and had a diet Coke.
  7. I covered both sides of each ornament top with some matte Mod Podge decoupage glue, to strengthen them.
  8. I stapled the ornament top to the ornament with a colored staple.  They were surprisingly hard to find, but I eventually tracked them down at Michael's.
  9. Using embroidery floss, I tied a small loop to each one so the recipients could attach an ornament hook.
Tips:
  • Rather than decoupage glue, use a Xyron machine, or just strong double-stick tape to adhere everything
  • Use an electronic die-cutting system if you've got one to cut circles quickly and more accurately
  • Skip using Mod Podge to "strengthen" cardstock on simple projects like these.  Plain heavy cardstock should be fine, or use a clear page reinforcement if it's the right side.
  • Use Photoshop elements to place the photos in the *exact* size needed on the page, then you only need simple cutting and corner rounding.
  • Write your last name and year on the back so you and others can remember your cute project long into the future. (Assuming they don't immediately recycle it...)
  • Make at least one extra to keep for yourself!
  • Don't sweat the small mistakes - people will be charmed by the fact that you made them something.  Unless they're super-critical and mean.  In which case, they don't deserve one anyway.  So there.
  • When making a bunch of the same design, do it assembly-line style after making the first proof-of-concept: cut all circles, glue all, staple all, etc.

Sunday, September 25, 2011

Kids' Artwork Display Banner - Experiment 6

I just completed this project today but I was so excited about it that I had to write it up. 

Long before I had a baby, I remember seeing photos of homes with kids' artwork framed beautifully and hung up. I loved the idea - I'm not a fan of buying artwork that just matches a room, but for hanging up things that really speak to me or tell a story about the people who live here. 

T's daycare regularly does messy art projects with all the kids, even the infants. We do art projects at home, but they're not as organized and cute as the ones they plan at daycare. Every couple of months her teachers send home the last several projects.

I'm not a pack rat (despite my huge collection of shiny new supplies) so I can easily let go of some of the pieces she brings home. We also have two adoring sets of grandparents who appreciate T's art, so I give them some. But I want to keep and display some of them. Until now I hadn't done much except stick a few  up on the magnet boards in my craft room.

A few months ago, while reading a craft book, I saw a photo of a bulletin board with a cute handmade sign to showcase the kids' art projects.  I knew I wanted to make something like that for our house, so I put it on the list of "someday maybe" projects.

Yesterday, I got motivated to FINALLY pick up all the stuff sitting on the floor of the craft room and DO something with it.  I threw away some things, found better storage places for others, and unearthed a bulletin board that was just the perfect size for the hallway outside T's room. 

I put up the board and tacked on three of her recent art projects.  And today, while my fabulous husband was at the football game, and my fabulous daughter went to her fabulous grandparents' place for an afternoon of fun, I got crafty.

I wanted to make a sign that announced Trillian's art. I love making banners.  Since I didn't have much time and really wanted to finish it in one sitting, I decided to use my largest circle punch and glittery letter stickers from my stash. 

Rather than a typical banner where the letters are attached to each other, I used my jewelry making brainspace and decided to "string" the letters onto ribbon, using brightly colored jump rings.  I figured this would give the sign more motion, and I also wanted to see if I could make what I pictured in my head.  Since the "beads" were made of paper, I thought I should reinforce the holes with metal eyelets.


Stuff
Fiskars Squeeze Punch X-Large, Round 'n Round
BasicGrey patterned cardstock
Pink Paislee glitter chipboard alphabet stickers
Crop-A-Dile Hole Punch and Eyelet Setter
Satin ribbon, 5/8" wide
Large 3/16" silver eyelets
Large anodized aluminum jump rings (1/4")
Packaging tape or nails/tacks for hanging

How
  1. I cut out enough circles from the cardstock with the circle cutter to spell out "trillian's art".  12, to be precise, plus a couple extra for mistakes.
  2. I arranged the cardstock circles with the patterns in the order I wanted them, and then stuck on the letter stickers, which I chose in a color and size so they'd be easy to read from a few feet. 
  3. I marked where I wanted the eyelets with a pencil. 
  4. Using the Crop-A-Dile, I punched 1/8" holes at the top of each letter of her name, and then the top and bottom of the ones spelling 'art' since they'd hang vertically.
  5. Using the wondrous Crop-A-Dile, I put in the eyelets. 
  6. Then, using pliers, I opened the jump rings, slipped them in the eyelets, and then closed them.  For the word 'art' I chained the letters together so they'd hang vertically.
  7. I cut a length of ribbon (about 3 feet) and strung the name letters on them, tying a knot at each end to keep the letters on. 
  8. At the beginning, before the knot, I added the string of letters spelling "art" and then tied another knot to keep that in place.
  9. I used clear packaging tape to secure the ends of the ribbon to the bulletin board.  Since the banner is small and light, this should be enough to hold it in place.
Tips & Tricks
  • Doing projects with repetitive elements goes a lot faster if you do it assembly line style - cut all pieces, then punch holes, then add eyelets, etc.
  • Count on making some mistakes, and make sure you have extra paper, eyelets, and stickers as needed.  Sometimes elements can be salvaged from the mistakes (I'm thrifty like that.)
  • When adding eyelets to punched holes,  make sure you've got enough space from the edge of the paper to the rim of the eyelet.  Also make sure the hole you're punching is big enough for the base of the eyelet - I like them to fit a little snugly, so I was using 1/8" holes for a 3/16" eyelet, but with delicate papers, this won't work well.
  • Don't cut ribbon until you're sure you have enough for your project.  You can always cut something shorter, but it's hard to make it longer. I always have to remind myself of this.
  • Look for materials in other departments of the craft store.  The jump rings I used were in the jewelry-making area. You never know what you might find!  In the same vein, when solving an "engineering" problem of how to attach things, or support things, think outside of your own craft, to another craft, or another application entirely!  I've gotten some interesting ideas from my husband, who is not a crafter, but is very mechanically inclined and handy.
BabyT liked the sign, which is appreciation enough for me. And I can assure you that I'll do everything in my power to keep that adorable jellyfish she made. I envision it hanging on the wall in my nursing home far in the future.  But for now, its rightful home is on her new art board, just outside her room.

What do you do with your kids' art projects?

Saturday, July 23, 2011

Birthday Card for a Musician - Experiment 5

Yep, I know it's been a looong time since the last post.  Months, in fact.  But I haven't been idle.  I've been chasing around a toddler, starting a new job, and squeezing in a crafty moment wherever I can.  Mostly that's come in the form of supply shopping, but I've made several cards, too.

Back in February, my friend Jenna had a birthday.  We had been lamenting about the fact that we rarely even had time to get a haircut because of the aforementioned toddler-chasing, so I figured the perfect present would be a gift card to a local swanky salon chain.  She just used it a month ago!

I knew I had to make a card with a pocket, similar to the New Mama card I had made.  What I love about making cards individually by hand is that I can personalize each one for the recipient.


Stuff:

I couldn't find all the exact supplies I had used, but these are similar.
Marvy Uchida lever craft punch - 1.25" star
Stampin Up' Curry dye ink pad
A2-sized DCWV textured yellow card base & white envelope
American Crafts Mini-Marks Rub-On Transfers-Celebration Book 2, Color
EK Success Inkadinkado Music Sheet Wood Stamp
Yellow 6X12 Alphabet Stickers (Studio Calico)


How:


1.  I had a new rubber stamp that was a bunch of jumbled sheet music scores, perfect for backgrounds and perfect for my musical friend.  I wanted a subtle tone on tone look, so I used a mustard colored dye ink from Stampin' Up on a pre-cut A2 sized dark yellow card base and stamped randomly to cover the card, re-inking each time.  I let this dry for about 10 minutes.

2.  Using the star punch, I made 5 stars from brown shimmer cardstock from my scrap pile.  I used lowercase cardstock letter stickers in a sparkly yellow that matched the card base for her name.

3.  I arranged the stars in a sort of constellation pattern and stuck them on the card with pop-dots to give them a 3-D look.

4.  My beloved Minimarks rub-ons in a dainty 'happy birthday' make up a border for the bottom of the card.

5.  I cut out a small strip of dark yellow cardstock for the pocket and stuck the sides and bottom down with double sided tape.  I used the same pack of rub ons to add the word "wish" in a corner of the pocket.  I also cut down a border sticker to add a bit of color inside the card, to match the gift card a little better and make it look less plain on the inside.

Tips:


  • Figure out a color scheme first.  That'll narrow down your choices of "stuff" to put on the card.
  • Lay out all the pieces before sticking anything.  Or use reusable adhesive, similar to the stuff that Post-It Notes use.
  • Heat-set the stamped background with a heat gun to be sure the ink is dry and doesn't smear.  Dye (water-based) inks dry pretty quickly, but pigment inks can take a lot longer to dry, and the stamping will smear if it's not completely dry.
  • Every now and then, put the card down and sit back and look at it.  Does it look "right" to you?  Is there a big empty space somewhere?  Does it need *something* more?
  • I like to add a couple of embellishments inside the card so it doesn't look too plain compared to the elaborate work I've done on the front.
  • When making pockets for gift cards or other thin items, remember to only tape or staple three sides of the pocket so that one side is open to slip the item in.  This is a total "duh" tip, but I can't be the only one who pasted the whole thing down and realized my mistake, right?

This was another fun project that just took a couple of hours from start to finish.  I spent most of my time trying to figure out *what* to do, and actually assembling this simple card was pretty quick.  More to come, so stay tuned!

Friday, February 25, 2011

Experiment 4 - New Baby Girl Card

A friend from work had a baby in January, and I found the perfect (totally impractical) gift for her. These shoes from pink2blue on Etsy are breathtakingly gorgeous in person.

I saw them long after BabyT was too big for them, so I was glad to have another person to buy them for. Those gorgeous shoes could only be presented with an equally cute card, so I worked hard on this one. It was a great project because I just sat down one evening and decided I was going to make it, and finished it in one sitting. That's what I love about making cards - they can be completed in a short time.


MATERIALS

TOOLS

METHOD
1. I cut strips of patterned and plain pink cardstock to fit the width of the card, in different heights, and used the decorative scissors on the piece at the bottom.

2. I stamped 'Welcome Baby' in brown pigment ink onto plain pink cardstock cut in a circle, then quickly poured on embossing powder and tapped to remove excess. I used a paintbrush to get rid of the stray bits (as well as I could), then hit it with the heat tool for a few minutes until the powder melted and became shiny.  It's a pretty dramatic change, so keep going if you don't see it happen.

3.  I mounted the embossed circle onto a dark pink patterned circle, and then mounted that onto a square of textured cardstock with 3 of the 4 corners rounded (I didn't want to be too symmetric!).

4.  Using the double-sided tape, I attached all of the paper strips to the front of the card, then the embossed piece.  I spelled out 'ELLA' using the cardstock stickers, and then used craft glue to stick the hydrangea cutouts to the card.

5.  The card didn't quite look "complete" so I added a row of faux brads along the top strip of paper.
SUMMARY

I'm quite pleased with how this turned out.  I had to restrain myself from using a ton of different pink patterned papers (I've got quite a stash) and stuck with the very cool crown print from my friend Jenn's scrap pile, and then a very subtle dark pink floral for one of the circles under the 'Welcome Baby' stamp.

I obviously can use some practice embossing - there were still stray bits of powder that wouldn't come off, making the design look a little "fuzzy" after embossing.  I tried using a plastic tray to easily recover the leftover powder, but it was very sticky plastic so I ended up just throwing out a bunch of it.  Next time, a plain piece of paper might work better.

The inside of the card was too plain - I probably should have used a bit of the patterned paper to tie it together a bit more.  Also, I cut out all the pieces first so I could move them around to find the best layout.  It's hard for me, because I get anxious to just finish it, but it's really better to save the tape and glue for the last step so I can make last-minute design changes.

My friend J liked the card and the shoes, so it's all good.  Thoughts from the Peanut Gallery?  Was this too traditionally girly?

Friday, February 11, 2011

Experiment 3 - Congratulations Card for the New Mama-To-Be

We have all been sick here for the past couple of weeks, passing around the same cold that came from BabyT's daycare.  It came back for me with a vengeance yesterday and I'm only just awake enough to string a couple of words together for a post.  If it's totally incomprehensible, that's the Nyquil talking.

I've got a running list of folks for whom I need to make New Baby cards and it's growing.  I love having specific people to make cards for - it helps me narrow the design options down and tailor it just for them. 

This one was for my friend N, who is about to have her 4th child (a boy).   I got her a Starbucks card, remembering her love of coffee when we worked together, and figuring that she probably had enough stuff for the baby by now.  Sometimes the mama needs a present too!  I got inspiration from a 2010 Cards magazine example that had a pocket for a coffee card. I selected the patterned paper first, to guide the color palette for the rest of the card.

Card for mama-to-be of new baby boy

MATERIALS

TOOLS

METHOD

  1. Using the paper trimmer, I trimmed the gingham paper just smaller than the card base.   I used the trimmed piece to create a pocket for the gift card - cut to slightly smaller than the width of the card.  I stamped the pocket with the 'congratulations' stamp inked lightly with the Tsukineko ink and put aside to dry.

  2. I used the individual rub on letters to spell 'mama' on a circle cut from the olive cardstock then added the chipboard '4' sticker to the circle.

  3. Now it was time to glue - yippee!  I used my Scotch tape runner to tape the gingham piece to the front of the card. I ran the tape on the sides and bottom of the smaller piece and taped it to the inside of the card, to make a pocket for the gift card.

  4. I glued the 'mama' circle to the front of the card, slightly off center, and added a cork flower with an adhesive rhinestone to the edge. With the craft glue, I added four flower jewels to the bottom of the card in a random pattern.

  5. I wrote my message with my wonderful glitter pens (they deserve their own post later!), put the Starbucks gift card in the pocket, wrote 'handmade by anandi' on the back, then left the card to dry for 24 hours.


SUMMARY

I was pretty happy with how this turned out, given that I had limited time to complete it.  I like that cards can be quick projects and once I decide on the basic color scheme, I just have to find a few embellishments to dress it up.   My fabulous husband suggested making the card in portrait orientation rather than landscape, when I found that it looked a little empty in landscape.  So hooray for getting a second set of eyes on it before gluing the bits together.

Cutting out the individual rub-on letters was a good idea, to get the right positioning.   I definitely did well by not gluing anything until I was happy with the placement.  Paperclips might be helpful to try out different layout ideas and not lose little pieces.

I stayed up too late working on this the first night, so I left it without gluing anything.  Coming back to it the second day was easier - I had some new ideas about placement and felt a little more inspired.  So taking a break can be a good thing, even with a deadline looming.  In my case, the "deadline" was lunch with N the next day.  At a certain point, one has to declare the project "done" - I could have messed with it longer, with only incremental improvements.  Cards are good for this too, since eventually you have to give it away to your recipient. 

Your thoughts?

sharing is nice

Related Posts with Thumbnails